Learn CPR. For Life™
Standard First Aid Course
If the victim was bitten by an unprovoked undomesticated animal such as a raccoon or a squirrel, an immediate shot may be necessary to prevent the possibility of a rabies infection. Contrary to common belief, a human bite can sometimes be more dangerous than that of an animal because human saliva contains many more types of bacteria which may cause infection.
A bite from a domestic pet can be painful but rarely requires a visit to the emergency room and unless obvious bodily harm was sustained, a simple precautionary treatment will suffice.
- Use anti-bacterial soap and water to thoroughly clean the bite wound.
- Apply antibiotic ointment such as Neosporin to prevent infection.
- If the injury resulted in broken skin, dress it with a sterile bandage and replace the dressing frequently.
- If the bite is deep, the victim may need to be treated for a puncture wound.
A fracture is a broken or cracked bone. For first aid purposes fractures can be divided into two classifications:
- Open (compound) fracture. The bone is broken and an open wound is present. Often the end of the broken bone may protrude from the wound.
- Closed (simple) fracture. No open wound is present, but there is a broken or cracked bone.
Broken bones, especially the long bones of the upper and lower extremities, often have sharp, sawtooth edges; even slight movement may cause the sharp edges to cut into blood vessels, nerves, or muscles, and perhaps through the skin. Careless or improper handling can convert a closed fracture into an open fracture, causing damage to surrounding blood vessels or nerves which can make the injury much more serious. A person handling a fracture should always keep this in mind. Damage due to careless handling of a closed fracture may greatly increase pain and shock, cause complications that will prolong the period of disability, and endanger life through hemorrhage of surrounding blood vessels.
If the broken ends of the bone extend through an open wound, there is little doubt that the victim has suffered a fracture. However, the bone does not always extend through the skin, so the person administering first aid must be able to recognize other signs that a fracture exists.
The general signs and symptoms of a fracture are as follows:
- Pain or tenderness in the region of the fracture
- Deformity or irregularity of the affected area
- Loss of function (disability) of the affected area
- Moderate or severe swelling
- Discoloration
- Victim’s information, if conscious (the victim may have felt the bone snap or break)
Be careful when examining injured persons, particularly those apparently suffering from fractures. For all fractures the first aider must remember to maintain an open airway, control bleeding and treat for shock. Do not attempt to change the position of an injured person until he/she has been examined and it has been determined that movement will not complicate the injuries. If the victim is lying down, it is far better to attend to the injuries with the victim in that position and with as little movement as possible. If fractures are present, make any necessary movement in such a manner as to protect the injured part against further injury.
Splints
Use splints to support, immobilize, and protect parts with injuries such as known or suspected fractures, dislocations or severe sprains. When in doubt, treat the injury as a fracture and splint it. Splints prevent movement at the area of the injury and at the nearest joints. Splints should immobilize and support the joint or bones above and below the break.
Many types of splints are available commercially. Easily applied and quickly inflated plastic splints give support to injured limbs. Improvised splints may be made from pieces of wood, broom handles, newspapers, heavy cardboard, boards, magazines, or similar firm materials.
Certain guidelines should be followed when splinting:
- Gently remove all clothing from any suspected fracture or dislocation.
- Do not attempt to push bones back through an open wound.
- Do not attempt to straighten any fracture.
- Cover open wounds with a sterile dressing before splinting.
- Pad splints with soft material to prevent excessive pressure on the affected area and to aid in supporting the injured part.
- Pad under all natural arches of the body such as the knee and wrist.
- Support the injured part while splint is being applied.
- Splint firmly, but not so tightly as to interfere with circulation or cause undue pain.
- Support fracture or dislocation before transporting victim.
- Elevate the injured part and apply ice when possible.
A break in the lower part of the leg requires two splints, one on each side of the leg (or at least the shin). If suitable material is not available, you can use the victim’s healthy leg as a makeshift splint.
As much as possible, keep the victim from moving and until an ambulance arrives, remember ICE:
- “I” is for ice – if possible apply an ice pack or ice cubes to the injured area. This will keep down the swelling and reduce pain.
- “C” is for compression – if the wound is bleeding, apply direct pressure with a clean cloth to reduce blood flow.
- “E” is for elevation – try to keep the injured area as high above heart level as possible. This will reduce blood flow to the injury and minimize swelling.
A typical bruise is a contusion caused by traces of blood escaping from small vessels that lie close to the skin’s surface. Since our blood vessels become more fragile with age, the elderly tend to bruise easier than healthy adults and children. Conversely, if a child sustains excessive bruising it may be an indication of a more serious injury and should be treated accordingly.
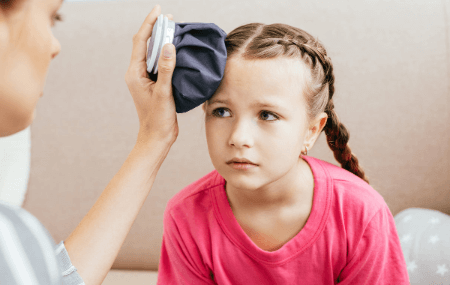
If the bruise is on the victim’s head and noticeable swelling occurs, he should be checked for head trauma. To reduce the bump and minimize the pain, have the victim elevate the injured area and apply a commercial ice pack or ice cubes wrapped in a towel for 30 to 45 minutes. Depending on the extent of the injury, this process should be repeated for a few days or until the swelling and the pain begin to dissipate.
Burns may be classified according to extent and depth of damage as follows:
1st degree: MINOR
- The burned area is painful.
- The outer skin is reddened.
- Slight swelling is present.
2nd degree: MODERATE
- The burned area is painful.
- The underskin is affected.
- Blisters may form.
- The area may have a wet, shiny appearance because of exposed tissue.
3rd degree: SEVERE
- Insensitive due to the destruction of nerve endings.
- Skin is destroyed.
- Muscle tissues and bone underneath may be damaged.
- The area may be charred, white, or grayish in color.
Burns may also be classified according to cause. The four major types of burns by cause are as follows:
- Chemical
- Thermal
- Electrical
- Radiation
The seriousness of a burn or scald is influenced by the extent of the body surface involved, as well as by the depth to which the tissues are penetrated. Burns can do more damage than injure the skin. Burns can damage muscles, bones, nerves, and blood vessels. The eyes can be burned beyond repair. The respiratory system structures can be damaged, with possible airway obstruction, respiratory failure, and respiratory arrest. Shock is very severe when burns are extensive and may cause death in a few hours.
First Aid for Burns
The first aid given to a burn victim largely depends on the cause of the burn and the degree of severity. Emergency first aid for burns or scalds should primarily be exclusion of air from the burned area, relief of the pain that immediately follows burns, minimizing the onset of shock, and the prevention of infection.
Remove all clothing from the injured area, but cut around any clothing that adheres to the skin and leave it in place. Keep the patient covered, except the injured part, since there is a tendency to chill. First aid dressings for burns and scalds should be free of grease or oil. The use of greases or oils in the treatment of burns makes it necessary to cleanse the burned or scalded areas with a solvent before medical treatment can begin. This delays the medical treatment and is very painful.
Be careful when dressing burns and scalds. Burned and scalded surfaces are subject to infection the same as open wounds and require the same care to prevent infection. Bandages should be loose enough to prevent pressure on burned surfaces. As swelling often takes place after burn dressings have been applied, check them frequently to see that they are not too tight. Watch for evidence of shock and treat if it is present. In cases of severe burns, transport the victim to the hospital as quickly as possible.
Burns of the Eyes by Chemicals
Frequently chemical substances, especially lime, cement, caustic soda, or acids or alkalis from storage batteries get into the eyes. The treatment is to wash the eyes freely with clean water. To do this, have the victim lie down, hold the eyelids open with the fingers and pour the water into the inner corner of the eyes from a pitcher or other container. Use plenty of water and wash the eyes thoroughly, being sure the water actually flows across the eyes. Do not put neutralizing solution in the eyes. Cover both eyes with moistened sterile gauze pads and secure in place. Chemical burns of the eyes should receive the attention of an eye specialist as soon as possible.
Chemical Burns
General first aid for chemical burns is as follows:
- Remove all clothing containing the chemical agent.
- Do not use any neutralizing solution, unless recommended by a physician.
- Irrigate with water for at least 15 minutes, use potable water if possible.
- Treat for shock.
- Transport to a medical facility.
First aid for dry chemical (alkali) burns is an exception to the general first aid for chemical burns because mixing water with dry alkali creates a corrosive substance. The dry alkali should be brushed from the skin and water should then be used in very large amounts.
Thermal Burns (Minor)
General first aid for minor thermal burns is as follows:
- Use cool, moist applications of gauze or bandage material to minimize blistering.
- Treat for physical shock.
If the victim has thermal burns on the eyelids, apply moist, sterile gauze pads to both eyes and secure in place.
Thermal Burns (Moderate and Critical)
General first aid for more serious thermal burns is as follows:
- Do not use cold applications on extensive burns; cold could result in chilling.
- Cover the burn with a clean, dry dressing.
- Treat for shock.
- Transport to a medical facility.
Electrical Burns
General first aid for electrical burns is as follows:
- Conduct a primary survey, as cardiac and respiratory arrest can occur in cases of electrical burns.
- Check for points of entry and exit of current.
- Cover burned surface with a clean dressing.
- Splint all fractures. (Violent muscle contractions caused by the electricity may result in fractures.)
- Treat for physical shock.
- Transport to a medical facility.
Respiratory failure and cardiac arrest are the major problems caused by electrical shock and NOT the burn. Monitor pulse and breathing while preparing victim for transportation.
Radiation Burns
Radiation presents a hazard to the rescuer as well as the victim. A rescuer who must enter a radioactive area should stay for as short a time as possible. Radiation is undetectable by the human senses and the rescuer, while attempting to aid the victim, may receive a fatal dose of radiation without realizing it. Notify experts immediately of possible radioactive materials contamination.
Choking is usually caused by a piece of foreign matter such as food becoming lodged in a person’s windpipe. Because a choking victim is fully aware that he cannot breathe normally, a sense of panic may overcome them, making assessing the situation and rescue efforts difficult. It’s important to try and keep the victim calm in order to determine whether your assistance is truly necessary or if the victim’s own coughing reflex is sufficient.
Start by asking the person if he is choking. This simple step can be deceptively effective – the victim may be coughing violently or even gasping for air, but if he is able to answer then he is probably not choking. A choking victim will not be able to speak since oxygen cannot reach his lungs. But if after asking the person if he’s choking all he can do is gesture or point to his throat and you notice his face starting to turn blue, then he is most likely choking and you will need to perform the Heimlich Maneuver immediately.
- Start by finding the proper stance – behind the victim with one of your feet approximately between the victim’s feet.
- Wrap one of your arms around the victim and place your hand in a closed fist just above his belly button.
- Place your other hand directly on top of the first.
- Squeeze the victim’s abdomen in quick upward thrusts as many times as it is necessary to dislodge the object in his windpipe.
Choking Rescue Procedure for infants
Similarly to adults, if an infant victim can cough or make sounds, you should allow him to try to dislodge the foreign matter on his own. If it appears that the infant is unable to breathe and is not coughing, crying or making any sound, do NOT leave the infant alone and dial 9-1-1 immediately.
Unlike for adult or older children victims, the Heimlich maneuver is not performed on a choking infant. Instead, the following steps should be performed if the infant is not breathing or is clearly struggling to breathe:
- Holding the infant securely, place him faced down on your forearm so that his head is lower than his chest.
- Support his head in the palm of your hand against your thigh or lap and ensure that you don’t cover his mouth or twist his neck.
- With the heel of your free hand give up to 5 firm back slaps between his shoulder blades.
- While still keeping his head lower than his body, turn him face up and look inside his mouth to see if the blockage had dislodged.
- If you can see the object and can safely remove it, do so – but do NOT stick your finger(s) into the infant’s throat to feel for blockage, as this may push it deeper into his windpipe.
- If the airway is still blocked (the infant is not breathing or crying), place 2 fingers on his breastbone just below the nipple line and give 5 quick chest thrusts.
- Again, check if the airway was cleared or if the infant begins to breathe on his own or to cry. If not, continue to perform 3 cycles of 5 back slaps and 5 chest thrusts, or until the object comes out, whichever comes first.
- If the infant is still not breathing, and you haven’t done so already, dial 9-1-1 to summon EMS and for assistance.
Once you are successful in getting the object out of the airway, the infant will be in distress and weak, and will need to be closely monitored. If you observe signs of weak breathing or the infant is experiencing difficulty swallowing, you should seek immediate medical help.
Breaks in the skin range from pin punctures or minor scratches to extensive cuts, tears and gashes. In First Aid, open wounds are divided into six categories: abrasions, amputations, avulsions, incisions, lacerations, and punctures.
Abrasions are caused by rubbing or scraping with the wound generally shallow and a portion of the skin damaged, leaving a raw surface with minor bleeding.
Amputations involve extremities such as fingers, toes, hands, feet, or entire limbs severed completely from the victim’s body. Depending on the type of amputation, bleeding may be excessive or very restricted.
Avulsions are injuries that tear a whole piece of skin and tissue from the body, usually as a result of violent or forcible separation. Although these injuries may often be successfully repaired if treated quickly, there is great danger of infection and bleeding.
Incisions are produced by a sharp cutting edge such as a knife or glass. If an incision is deep, major blood vessels and nerves my be severed making it difficult to control blood flow.
Lacerations are similar to incisions but have rough or jagged edges with the flesh torn or cut with a blunt edge.
Puncture wounds are produced by pointed objects being forced through the skin. Although the small number of blood vessels damaged sometimes prevents excessive bleeding, there is danger of infection due to this poor drainage.
General First Aid for bleeding
The main objectives in administering first aid to a bleeding victim are to stop blood flow and to prevent germs from entering the wound.
- expose the wound by carefully cutting away at clothing around it
- carefully remove any loose foreign body around the wound with clean material, always wiping away from the wound
- if an object has impaled the victim, do not attempt to remove it as this may cause excessive bleeding and other serious injury
- dress the wound with sterile gauze or similar material, covering the wound completely
- unless otherwise specified, apply direct pressure to the wound to stem blood flow
- keep the victim still and calm
- if necessary, treat the victim for shock
- seek medical attention