Module 3. Injuries & Trauma Care
Understanding Open Wounds
Open wounds range from minor cuts and scrapes to serious, life-threatening injuries. These injuries increase the risk of infection and blood loss, making timely first aid essential. Wounds are generally classified into six types based on the mechanism of injury.
Types of Open Wounds & Traumatic Injuries
1.
Abrasions (Scrapes)
×
Abrasions (Scrapes)
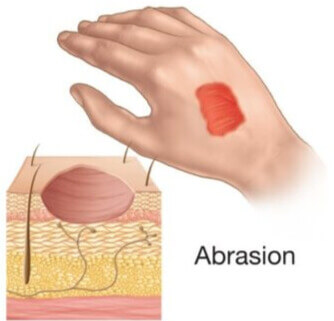 © FAW Training Solutions – All rights reserved

- Cause: Rubbing or scraping against a rough surface
- Appearance: Shallow surface damage with minor bleeding
- Risk: Low, but infection is a concern
First Aid
- Clean the area with soap and water.
- Apply antibiotic ointment to prevent infection.
- Cover with a sterile bandage.
2.
Amputations
×
Amputations
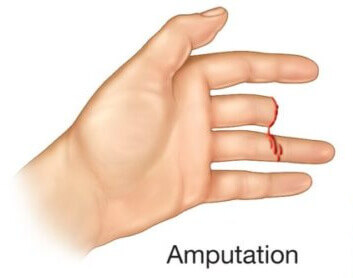 © FAW Training Solutions – All rights reserved

- Cause: Complete loss of a body part (e.g., fingers, hands, limbs)
- Bleeding: May be heavy or minimal depending on blood vessel constriction
First Aid
- Control bleeding with direct pressure.
- Wrap the severed part in sterile gauze, place in a sealed plastic bag, and keep it cool — but not directly on ice.
- Treat the person for shock.
- Call 911 immediately.
3.
Avulsions
×
Avulsions
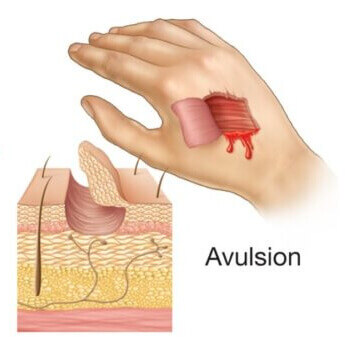 © FAW Training Solutions – All rights reserved

- Cause: Forceful tearing of skin or tissue (e.g., machinery injuries, bites)
- Risk: High risk of infection and significant bleeding
First Aid
- Apply direct pressure to control bleeding.
- Reposition torn skin (if possible) and cover with a sterile dressing.
- Seek immediate medical attention.
4.
Lacerations & Incisions
×
Lacerations & Incisions
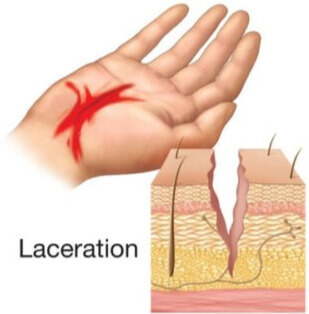 © FAW Training Solutions – All rights reserved

- Cause: Cuts from sharp objects or blunt trauma (e.g., knives, glass, or impact injuries)
- Bleeding: Moderate to severe; clean cuts may bleed more heavily if vessels are involved
First Aid
- Apply direct pressure to stop bleeding.
- Rinse gently to remove debris (avoid scrubbing).
- Cover with a sterile dressing.
- Elevate the wound if possible.
Seek Medical Help If:
- The wound is deep or gaping.
- Muscle, fat, or bone is visible.
- Bleeding continues after 10 minutes of pressure.
5.
Puncture Wounds
×
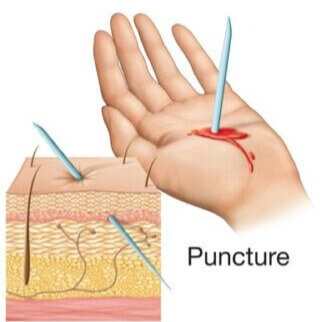
Puncture Wounds
 © FAW Training Solutions – All rights reserved

- Cause: Sharp, narrow objects (e.g., nails, needles, animal bites)
- Bleeding: Often minimal externally, but high risk of infection internally
First Aid
- Do not remove deeply embedded objects.
- Flush with clean water to reduce infection risk.
- Loosely bandage the wound.
- Watch for signs of infection such as redness or swelling.
Tetanus Alert: Puncture wounds may require a tetanus booster if not up to date.
6.
Crush Injuries
×
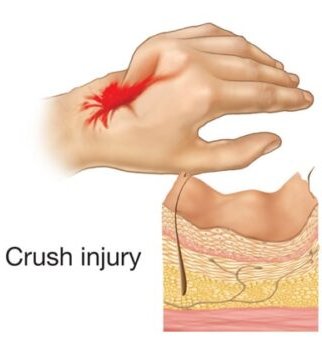
Crush Injuries
 © FAW Training Solutions – All rights reserved

- Cause: Prolonged pressure or heavy force applied to a body part (e.g., machinery, collapsed structures)
- Appearance: May involve bruising, swelling, broken bones, or open wounds
- Risk: High risk of internal bleeding, nerve damage, and compartment syndrome
First Aid
- Call 911 immediately — this is a medical emergency.
- Do not remove the crushing object unless it’s safe and trained help is available.
- Control visible bleeding with sterile dressing and gentle pressure.
- Treat for shock: keep the person warm and monitor breathing.
Controlling Bleeding
Steps to Control Bleeding
- Expose the wound by removing or cutting away clothing.
- Clear away loose debris. Do not remove embedded objects.
- Apply firm, direct pressure using sterile gauze or a clean cloth.
- Maintain pressure for at least 10 minutes or until bleeding stops.
- Elevate the affected area above heart level if possible.
- Watch for signs of shock such as pale skin or weakness.
- Call 911 for serious injuries or uncontrolled bleeding.
When to Call 911
- Bleeding does not stop after 10 minutes of firm pressure.
- The wound is deep, gaping, or spurting blood.
- The person shows signs of shock (confusion, pale skin, rapid pulse).
- A body part has been amputated.
- A foreign object is embedded in the wound.
Key Takeaways
- Wound types include abrasions, lacerations, incisions, avulsions, punctures, and amputations.
- Apply direct pressure and cover wounds to prevent infection.
- Never remove embedded objects or apply ointments to serious injuries.
- Cool and preserve amputated parts appropriately if reattachment is possible.
- Call 911 for heavy bleeding, shock, or serious trauma.
Understanding Burn Severity
Burns are classified based on depth of damage and cause. Identifying the type and severity of a burn is essential for proper first aid and emergency response.
Degrees of Burn Severity
×
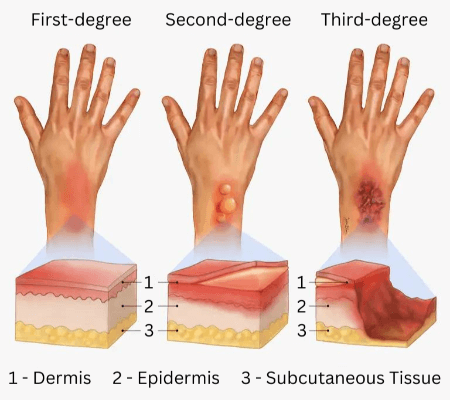
Degrees of Burn Severity
 © FAW Training Solutions – All rights reserved

- 1st Degree (Minor Burns): Affects only the outer layer of skin (epidermis).
Symptoms: Redness, pain, mild swelling. - 2nd Degree (Moderate Burns): Affects deeper layers of skin (dermis).
Symptoms: Blisters, intense pain, wet or shiny appearance. - 3rd Degree (Severe Burns): Destroys all layers of skin and may reach muscle or bone.
Symptoms: No pain (nerve damage), charred or white skin, possible muscle or bone exposure.
Important: Third-degree burns require immediate emergency medical attention.
Burn Types by Cause
×
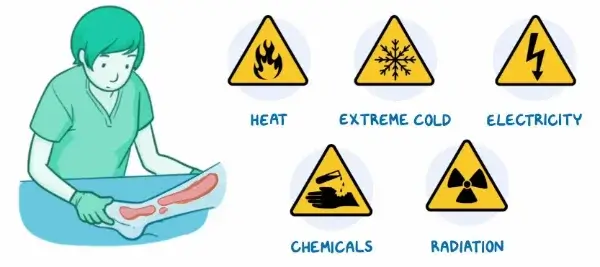
Burn Types by Cause
 © FAW Training Solutions – All rights reserved

- Thermal Burns: Caused by contact with heat sources such as flames, hot liquids, or steam.
- Chemical Burns: Caused by acids, alkalis, or other caustic substances.
- Electrical Burns: Caused by electrical current passing through the body.
- Radiation Burns: Caused by prolonged exposure to radiation, including UV rays and radioactive material.
Severe burns can damage not only skin but also muscles, nerves, blood vessels, and even the respiratory system if smoke or chemical fumes are inhaled. Burn victims are also at high risk for shock.
General First Aid for All Burns
- Remove the person from the source of the burn (heat, chemicals, electricity, radiation).
- Remove any clothing from the burned area unless it is stuck to the skin.
- Do not apply ointments, butter, oils, or home remedies—they trap heat and may cause further injury.
- Monitor for signs of shock and treat accordingly.
First Aid by Burn Type
Thermal Burns
For Minor Burns (1st Degree or Small 2nd Degree):
- Cool the burn with cool (not ice-cold) water for at least 10 minutes.
- Apply a clean, moist dressing to reduce pain and blistering.
- Do not pop blisters.

- Do not apply water to large or deep burns—this may cause hypothermia or shock.
- Cover the area with a dry, sterile dressing.
- Treat for shock and call 911 immediately.
Burns to the Eyelids: Apply moist, sterile gauze to both eyes and secure loosely.
Chemical Burns
- Remove any contaminated clothing immediately.
- Flush the affected area with large amounts of water for at least 15 minutes.
- Do not use neutralizing solutions.
- For dry chemicals, brush away any powder before rinsing.
- Transport the victim to medical care as soon as possible.
Chemical Burns to the Eyes:
- Position the victim lying down.
- Gently hold eyelids open and flush from the inner corner outward with water.
- Cover both eyes with sterile gauze and seek immediate medical attention.
Electrical Burns
- Ensure the power source is turned off before touching the victim.
- Check for breathing and pulse—begin CPR if necessary.
- Look for both entry and exit wounds.
- Cover visible burns with a dry, sterile dressing.
- Splint any fractures caused by violent muscle contractions.
- Call 911 immediately—internal damage may not be visible.
Radiation Burns
- Minimize your own exposure and move the victim away from the radiation source.
- Cover the affected area with a dry, sterile dressing.
- Contact emergency services and radiation authorities as soon as possible.
When to Call 911
- The burn is larger than the size of the victim’s palm.
- The burn is on the face, hands, feet, groin, or over joints.
- The burn is full-thickness (3rd degree) or caused by electricity or chemicals.
- The victim has trouble breathing or appears to have airway involvement.
- There are signs of shock (pale skin, rapid pulse, confusion, weakness).
Key Takeaways
- Burns are classified by depth (1st, 2nd, 3rd degree) and cause (thermal, chemical, electrical, radiation).
- Cool minor burns with water but do not use ice, butter, or ointments.
- Flush chemical burns with water for at least 15 minutes unless it is a dry chemical—brush that off first.
- Electrical burns require assessment for internal damage and possible CPR.
- For severe or widespread burns, seek emergency help and be ready to treat for shock.
Understanding Dental Emergencies
A dental emergency occurs when a tooth is broken, knocked out, or severely damaged, often due to falls, sports injuries, accidents, or biting down on something hard.
Quick action can save a knocked-out tooth. A tooth has the best chance of survival if replaced within 30 minutes.
Common Dental Emergencies & First Aid
1.
Knocked-Out Tooth (Avulsed Tooth)
×
Knocked-Out Tooth (Avulsed Tooth)
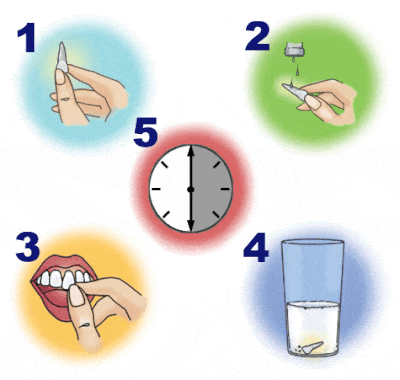 © FAW Training Solutions – All rights reserved

- Handle the tooth by the crown (top part), not the root.
- Do not scrub or wash the root—this can remove tissue needed for reattachment.
- If possible, reinsert the tooth into the socket and have the person bite down on gauze.
- If reimplanting is not possible, keep the tooth moist:
- Place it in milk (preferred option).
- If no milk is available, use saliva or a tooth preservation kit.
- Do not store it in water.
- Seek immediate dental care.
2. Chipped or Broken Tooth
- Save the broken piece if possible.
- Rinse the mouth with warm water to clean the area.
- Apply a cold compress to reduce swelling.
- Avoid eating hard foods until evaluated by a dentist.
- If the nerve is exposed (severe pain or bleeding), seek care immediately.
3. Severe Toothache
- Rinse the mouth with warm water to remove debris.
- Gently floss to remove any trapped food.
- Do not apply aspirin directly to the gums or tooth—it may damage tissue.
- Use a cold compress on the cheek to ease pain.
- Seek dental evaluation if pain persists or worsens.
4. Object Stuck Between Teeth
- Gently use dental floss to remove the object.
- Rinse with warm water.
- If the object cannot be removed, see a dentist.
- Do not use sharp objects such as pins or knives.
5. Lip, Tongue, or Gum Injuries
- Apply direct pressure with clean gauze to control bleeding.
- Use a cold compress to minimize swelling.
- If the cut is deep or bleeding persists, seek medical care.
When to Call 911
- Bleeding does not stop after applying pressure.
- A knocked-out tooth cannot be preserved or replaced in time.
- The tooth is broken and causes intense pain or exposes the nerve.
- There are signs of infection (swelling, fever, facial pain).
- The person has difficulty breathing or swallowing due to swelling.
Key Takeaways
- Handle knocked-out teeth by the crown and attempt reimplantation quickly if possible.
- Keep the tooth moist—use milk, saliva, or a tooth preservation kit, not water.
- Seek dental care immediately for broken, chipped, or painful teeth.
- Use caution with oral injuries—avoid using sharp tools and monitor for infection.
- Call 911 if bleeding won’t stop, the injury causes breathing difficulty, or there are signs of severe infection.
Understanding Eye Injuries
The eyes are extremely sensitive, and even minor injuries can cause serious complications. Prompt First Aid is essential to prevent permanent damage or vision loss.
Common Eye Injuries and First Aid
Black Eye (Bruising Around the Eye)
- Cause: Trauma to the area around the eye, causing blood to collect under the skin.
- Risk: Usually mild, but may be serious if blood collects inside the eye (hyphema).
First Aid:
- Apply a cold pack or ice wrapped in cloth to reduce swelling.
- Do not apply pressure directly on the eyeball.
- Monitor for worsening symptoms.
Seek medical attention if:
- There is blurred or distorted vision.
- There is bleeding inside the eye (hyphema).
- The person experiences severe pain or light sensitivity.
Foreign Object in the Eye
- Cause: Dust, dirt, metal shavings, or other debris trapped under the eyelid.
- Risk: Can cause corneal abrasion, irritation, or infection.
First Aid:
- Wash hands before touching the eye.
- Gently pull down the lower eyelid while the person looks up; reverse for upper eyelid.
- Flush the eye with clean water or saline solution to attempt removal.
Do NOT:
- Attempt to remove an embedded object.
- Rub the eye, as this can worsen the injury.
Seek medical attention if:
- The object cannot be removed.
- There is persistent pain, redness, or vision changes.
- The object is embedded in the eye.
Chemical Exposure to the Eye
- Cause: Exposure to acids, alkalis, cleaning agents, or fumes.
- Risk: Chemical burns may lead to permanent vision damage or blindness.
First Aid:
- Flush the affected eye with running water for at least 20 minutes.
- Ensure water flows away from the unaffected eye.
- Do not use eye drops or other solutions unless instructed by a medical provider.
Special Considerations:
- If available, use an eyewash station immediately.
- Use any clean water source if an eyewash is not available.
When to Call 911
- The eye is bleeding internally (hyphema).
- A foreign object is embedded in the eye.
- The person experiences vision loss or intense pain.
- Chemical exposure causes irritation, redness, or visual changes.
Key Takeaways
- Apply cold packs for black eyes—never direct pressure on the eyeball.
- Flush eyes with water for foreign objects or chemical exposure.
- Never rub an injured eye or attempt to remove embedded objects.
- Seek emergency care for severe pain, vision loss, or chemical injury.
What is a Fracture?
A fracture is a break or crack in a bone, ranging from mild to severe. Some fractures are obvious, while others may not be immediately visible. Recognizing the signs of a broken bone is essential for proper First Aid and to prevent further injury.
Types of Fractures
-
Open (Compound) Fracture:
The bone breaks through the skin. High risk of infection.×Open (Compound) Fracture:
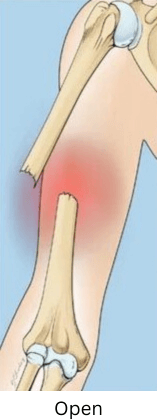 © FAW Training Solutions – All rights reserved
 -
Closed (Simple) Fracture:
×Closed (Simple) Fracture:
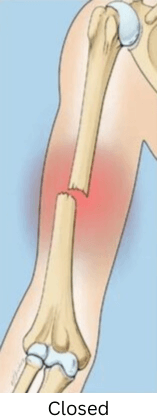 © FAW Training Solutions – All rights reserved
The bone is broken but does not puncture the skin. -
Displaced Fracture:
×Displaced Fracture:
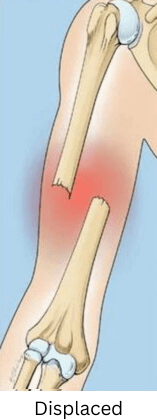 © FAW Training Solutions – All rights reserved
The bone breaks into two or more parts and shifts out of alignment. This type often requires surgical intervention to realign the bones. -
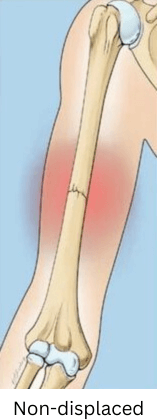
Non-Displaced Fracture:
×Non-Displaced Fracture:
 © FAW Training Solutions – All rights reserved
The bone cracks or breaks but remains properly aligned. These may heal more easily with immobilization alone.
Important: Fractured bones can damage blood vessels, nerves, and muscles. Avoid unnecessary movement to prevent complications.
Recognizing a Fracture
- Pain or tenderness at the injury site
- Swelling and discoloration (bruising)
- Visible deformity or limb appearing out of alignment
- Inability to move or bear weight on the affected area
Important: Do not move the injured area unless necessary for safety.
First Aid for Fractures
Step 1: Keep the Person Still
- Do not move the injured area unless necessary for safety.
- If the person is lying down, keep them in that position and avoid repositioning the limb.
Step 2: Control Bleeding (Open Fractures)
- Do not attempt to push the bone back in.
- Cover the wound with a sterile dressing.
- If bleeding is present, apply gentle pressure around (not directly on) the bone.
Step 3: Immobilize the Injury
Use a splint to stabilize the area above and below the break:
- Do not attempt to straighten the bone.
- Use padding to protect the injury and prevent pressure points.
- Secure the splint so that it immobilizes the joints above and below the fracture.
- Ensure the splint is snug but not tight—check circulation regularly.
- Elevate the limb if possible to reduce swelling.
Examples of improvised splints:
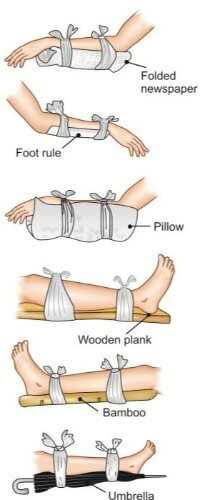
Special note for lower leg fractures: If no materials are available, gently bind the injured leg to the uninjured leg for support.
The
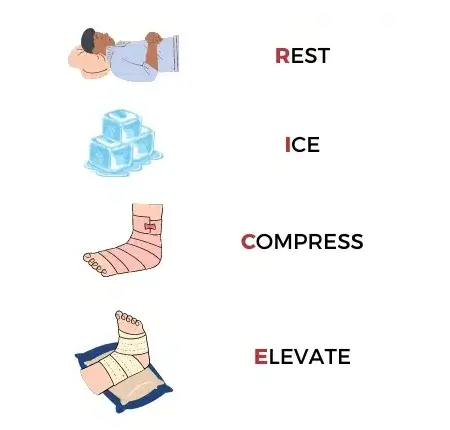
R-I-C-E Method
×
R-I-C-E Method
 © FAW Training Solutions – All rights reserved
for Fractures

R – Rest
- Keep the injured area still and avoid using it.
- Movement can worsen the injury and delay healing.
I – Ice
- Apply a cold pack to reduce pain and swelling.
- Wrap ice in a cloth—never apply directly to the skin.
C – Compression
- If bleeding is present, apply gentle pressure with a clean cloth or bandage.
- Do not wrap tightly—ensure circulation is not restricted.
E – Elevation
- Keep the injured limb elevated above heart level if possible.
- This helps reduce swelling and internal bleeding.
When to Call 911
- The bone is visibly deformed or protruding through the skin
- Bleeding cannot be controlled with direct pressure
- The injured limb feels numb, cold, or turns pale/blue
- The person shows signs of shock (confusion, weak pulse, rapid breathing)
- The person loses consciousness
Key Takeaways
- Fractures may be open or closed—both require immobilization and care.
- Never attempt to straighten a broken bone.
- Use a padded splint to stabilize the injury and prevent further harm.
- Apply the ICE method to reduce swelling and bleeding.
- Call 911 for open fractures, severe bleeding, or signs of shock.
Understanding Head Injuries
Head injuries range from minor bumps and bruises to serious traumatic brain injuries (TBI). Even seemingly mild head injuries can be dangerous. Prompt recognition and proper First Aid can help prevent permanent damage or death.
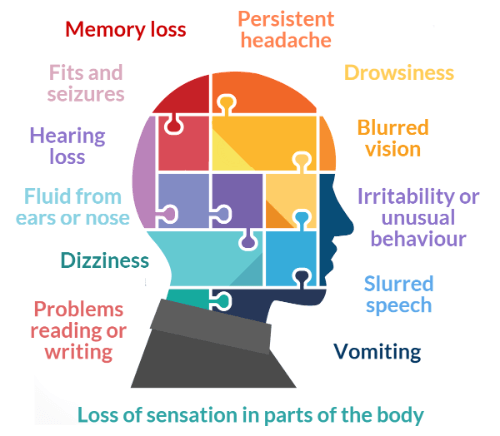
Signs of a Serious Head Injury
×
Signs of a Serious Head Injury
 © FAW Training Solutions – All rights reserved

- Excessive bleeding from an open head wound
- Loss of consciousness (even briefly)
- Shallow or irregular breathing
- Severe disorientation, confusion, or memory loss
- Clear fluid (cerebrospinal fluid) leaking from the nose or ears
- Seizures or uncontrolled body movements
- One pupil larger than the other
- Slurred speech or difficulty walking
Important: If any of these symptoms are present, call 911 immediately.
First Aid for a Serious Head Injury
- Call 911 immediately if the person loses consciousness or has any severe symptoms.
- Keep the victim still and avoid moving their head or neck.
- Lay the person down with their head and shoulders slightly elevated, unless spinal injury is suspected.
- If bleeding is present, gently cover the wound with gauze or a clean cloth. Apply light pressure only if a skull fracture is not suspected.
- Do not remove objects stuck in the wound.
- Do not leave the person alone—monitor for changes in condition.
- If the person stops breathing, begin CPR and continue until help arrives.
Tip: If possible, keep the person in a quiet, dimly lit environment to minimize stimulation.
First Aid for a Minor Head Injury
- Apply a
cold pack
×cold pack
 © FAW Training Solutions – All rights reserved
to reduce swelling. - Encourage rest and observe the person for at least 24 hours.
- Monitor for signs of worsening symptoms such as nausea, vomiting, confusion, or dizziness.
Important: Seek medical care if symptoms worsen or new symptoms develop.
When to Call 911
- The person loses consciousness, even briefly
- Severe confusion, memory loss, or difficulty speaking
- Excessive or uncontrolled bleeding from the head
- Seizures or loss of motor control
- Clear fluid leaking from the nose or ears
Key Takeaways
- Head injuries can range from mild to life-threatening.
- Watch for red flags like unconsciousness, disorientation, and fluid drainage.
- Keep the person still, minimize movement, and call EMS for serious signs.
- Use cold packs for minor bumps, but continue observation for at least 24 hours.
What is a Spinal Injury?
A spinal injury occurs when the spinal cord is damaged
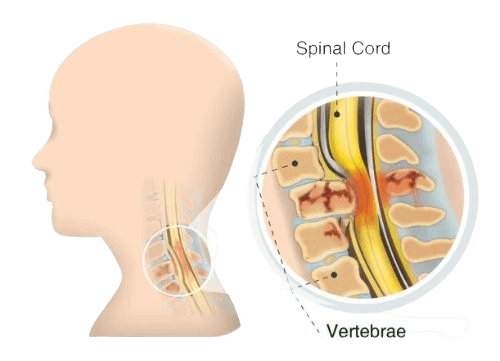
Important: Do NOT move the person unless they are in immediate danger (e.g., fire, drowning). Improper movement may worsen spinal damage.
Common Causes of Spinal Injuries
- Falls from a height (stairs, roofs, ladders, cliffs)
- Vehicle collisions (car or motorcycle)
- Diving into shallow water
- Sports injuries (football, gymnastics, extreme sports)
- Blunt or penetrating trauma (gunshots, stabbings, heavy impact)
- Heavy objects falling on the back or neck
Signs & Symptoms of a Spinal Injury
- Severe pain or pressure in the neck, back, or spine
- Numbness, tingling, or loss of sensation in limbs
- Inability to move arms or legs (partial or full paralysis)
- Difficulty breathing
- Loss of bowel or bladder control
- Obvious deformity or twisted appearance of the spine or neck
Important: If any of these symptoms are present, assume a spinal injury and call 911 immediately.
First Aid for Spinal Injuries
Step 1: Call 911 Immediately
- Do not move the person unless absolutely necessary.
- Keep them as still as possible until EMS arrives.
Step 2: Stabilize the Head and Neck
- Place your hands on both sides of the person’s head to prevent movement.
- If the person is wearing a helmet, do not remove it.
- If the person is standing, encourage them to stay still.
Step 3: Keep the Person Calm and Monitored
- Speak to them calmly to keep them conscious and reassured.
- Do not allow them to turn their head, sit up, or roll over.
- Monitor breathing and pulse—be prepared to begin CPR if needed.
Important: Only move a person with a suspected spinal injury if there is immediate danger (e.g., fire, flooding). If necessary, use the log roll technique to maintain alignment of the head, neck, and spine.
When to Call 911
- The person has suffered a fall, accident, or trauma to the head/back.
- They exhibit signs of paralysis, numbness, or loss of motor function.
- They have difficulty breathing or show signs of respiratory distress.
- The spine or neck appears twisted or deformed.
Reminder: Spinal injuries require professional emergency care—time is critical.
Key Takeaways
- Spinal injuries can result in paralysis or death—treat every suspected case as serious.
- Do not move the victim unless absolutely necessary for safety.
- Stabilize the head and neck, keep the person calm, and call EMS immediately.
- Monitor for breathing or circulation problems and prepare to give CPR if needed.